Showing posts with label Recipe. Show all posts

Wednesday, 28 August 2013

Biscuit Corn Sev Poori

We had this quick and super easy biscuit corn sev poori recipe made this weekend for snacks when we were super hungry :). Just some ready-made and some already available ingredients made to work together , giving a sweet-sour-tangy taste to satisfy the taste buds :)

Ingredients:

  1. 10 salty biscuit - I used the parley monaco biscuits, you can use any you like, even the regular cream crackers
  2. fine sev or any potato mixture  like the haldiram aaloo bhujiya or the lahar aloo bhujiya - 1/2 cup
  3. finely chopped corianders - 1/4 cup
  4. finely chopped onion - 1/2 cup
  5. finely chopped tomato - 1/2 cup
  6. one large potato - boiled and finely mashed
  7. one cup boiled corn or sweet corn kennels
  8. 1 tsp roasted cumin powder
  9. 1 tsp roasted coriander powder
  10. 1 tsp black salt powder
  11. 2-3 tsp green chutney
  12. 2-3 tsp sweet chutney - can be tamarind or tomato or mango - whatever you prefer
  13. 2-3 tsp diluted tamarind paste
  14. salt to taste
  15. green chilli -1 - finely chopped

Method:

Spread the biscuits on a plate. Mix the mashed potatoes, corn, coriander leaves, coriander powder,  cumin powder, onion, tomato, black salt, salt and green chilli together and add equal portions of this mixture on top of each biscuit. Top each one of these with equal portions of green chutney, sweet chutney and diluted tamarind paste. Spread sev equally over each one of these and serve immediately.
Below is a snap of how mine looked after preparing, could have been a better snap. I will post more when again make this dish a second time. But believe me, it turned out to be so mouth watering tasty, I am sure I will make another one soon.

 Diluted tamarind paste:You can make it by mixing 1/4 tsp readymade tamarind paste with 2-3 tbsp water and properly dissolve the tamarind paste in water, or you can also make it by dissolving one ripe tamarind ball in 2-3 tbsp water, ofcourse after de-seeding it.
Green chutney: You can use a standard green coriander chutney, or a coriander+garlic chutney or a mint coriander chutney for the same. Here are some great links on how you can make it:
(I will post my own blog on how to prepare each one of these, as soon as possible, please bear with me till then)
Sweet chutney: You can use a sweet tamarind chutney or a sweet mango chutney. I will soon write to you how I prepare them, till then, you can use these links for reference :

Monday, 19 August 2013

Ma's Aaloo Parathas

Difficulty Level : Medium

Time Required : 1 Hour +


Well, I need not stretch on the authenticity and the taste of this delicacy. It's directly from Mom, she made it yesterday morning for breakfast. It was one of those rare occasions when she kept taking out the hot parathas right from the pan and we ate, without keeping a track, could eat no more. So, here goes the recipe for mom's aaloo paratha (The recipe below would serve 4) :

Ingredients:

For the filling:

  • Potatoes , medium - 4  , boiled and peeled
  • Onion - 1 medium
  • Garlic - 6-7 cloves
  • Ginger - 1" piece
  • Salt to taste
  • Turmeric powder - 1/2 tsp
  • Coriander powder - 1/2 tsp
  • Cumin powder - 1/2 tsp
  • Garam masala powder - 1/4 tsp
  • Green chillis - 2 to 3
  • Red chilli powder - 1/8 tsp (almost 2 pinches)
  • 1 tbsp vegetable oil for frying the filling material.
  • 1 tsp ghee or refine oil or butter for each of the parathas.
  • 1 tbsp finely chopped coriander leaves

For the Dough: 

  • 2 cups whole wheat flour  
  • Enough water to kneed a soft dough

Method:

For preparing the filling, cut onion into small pieces. Mince the ginger and garlic . In a heavy bottom frying pan or wok, heat 1 tbsp vegetable oil. When hot, add the onion, ginger and garlic to it. Saute till the onion turns translucent. Then add the spices and green chilli (cut into fine pieces) to it. Cook for another 2-3 minutes, or, until the spices give a cooked aroma. Mash the boiled and peeled potatoes and add to the pan. Mix well with rest of the spices etc. Sprinkle salt as per taste and then mix everything well. Smooth out the filling mixture so that there are no lumps left into it. (If there are lumps left, when you will fill it in your parathas, they may split while rolling). Now, add the finely chopped coriander leaves to the filling mixture and mix well. Set it aside to cool while you work on the dough. For the dough, take the wheat flour and gradually add water to it, making a soft dough. Divide this dough into 12 equal portions. Take each portion between your palms and then roll it into a smooth ball (like you do to make any other chapati or flat Indian bread). Now, make a dip inside one  ball with your finger, add a teaspoon of the filling mixture inside it and then seal its mouth (like you do for any stuffed paratha). Dust with dry flour and roll out paratha using an Indian rolling pin. Now , heat a pan and put the paratha into it. Apply 1/2 tsp oil/ghee to both sides of the paratha and let it cook on the pan till its cooked (it would turn dusky in color with golden brown patches on it :) )
Make the rest of the parathas the same way. Serve them hot. 

Serving the potato stuffed parathas:

Potato stuffed parathas can be served with a verity of side dishes like curd, raita, kheer (rice pudding), sewai (vermicelli pudding), or chutneys like tomato chutney, green chutney, coriander chutney, pudina chutney,sweet mango or tamarind chutney, anchar (pickles), or any gravy reach vegetables like masala gobhi (cauliflower curry) or chole (chikpeas curry). Slowly I will add the recipes for these as well ,to the blog :)

Invariantions while roasting the parathas:

You can roast the potato stuffed parathas in more than one ways. You can either choose the way I described above, or, you can roast it dry , take it out of tawa/pan and then apply butter or ghee on top of it. Its a delight to see the butter melting on your hot paratha. This option of applying the ghee or butter on the parathas post preparing them makes them softer while with the previous procedure of applying oil to them while they are on the pan, you can make them crunchier if you want.

Finally, a snap of my mother's yummy aaloo parathas:

Wednesday, 14 August 2013

Paneer Malai Kofta

Difficulty Level : Medium 

Time Required : 1 Hour +


This recipe is not really tough, just takes a bit more time to prepare - anywhere between 30-45 minutes. But once done, you won't at all regret the time spent, and in fact, you would like to spend time on it as much as possible :)
Here goes the recipe, I prepared it yesterday and my whole family liked it a lot. This recipe would serve 4-5 people.
Ingredients:
  • Potatoes - medium - 3 , boiled and peeled
  • Paneer or cottage cheese - 200 gm
  • Raisins - 1 tbsp
  • Cashewnuts - 3 tbsp
  • Fresh cream - 1/2 cup (if not available , replace by 1/2 cup thickened milk)
  • Coriander powder - 1 and 1/2 tsp
  • Garam masala powder - 1/2 tsp (I substituted it with kitchen kind masala)
  • salt - as per taste
  • Corn flour - 3 tbsp
  • Refined oil - 1 cup - for deep frying the koftas
  • Vegetable oil or mustard oil - 3 tbsp for preparing the curry
  • Onion - 1 large
  • Tomatoes - 2 large
  • Green chilli - 1
  • Khara garam masala - 2 cardamom, 2 cloves and 1medium  piece of cinnamon
Method:
For the Koftas:
Mash the potatoes. Grate the paneer and add to the mashed potatoes. Add corn flour, salt to taste , 1/2 tsp coriander powder, 1/4 tsp garam masala powder, all the raisins and 1 tbsp cashew nuts to it. Mix everything together. Take small amounts of this mixture into your hand and roll into a round ball. 
Try making all the balls of the same size, for this, you can pre-divide the mixture into equal portions. You can make small, medium or large balls depending on your choice. Put a heavy bottom pan on the stove and pour the refined oil into it. Let the oil heat up to frying temperature. One by one drop the balls in the the oil and let them fry till golden brown. Turn them once or twice so that they are equally fried from all sides. Take them out. Below are some snaps of the balls (koftas) that I prepared:
One side of the plate are the koftas which are fried (golden brown ones) and the other side are the one to be fried.


All koftas fried :)
For the curry or gravy:
Peel and cut the onion into 2 halves. Cut the tomatoes in 2 halves as well. Add them to a pan with water and let them boil on medium heat for 7-10 minutes. Once done, put off the flame, take them out and let them cool. Add 2 tbsp cashew nuts to water and leave them soaked for 10 minutes. After 10 minutes, grind them to a fine cashew paste and set aside. Once the onion and tomato pieces are cold enough to grind in a mixie, add them to the mixer along with the chilli and grind to a smooth paste. Put a wok on the flame and add the mustard oil to it. When hot, add the onion and tomato paste and then fry it till the raw smell of tomatoes is gone (takes nearly 10 minutes) . Then add to it 1 tsp coriander powder, 1/4 tsp garam masala powder, salt to taste and fry for 2-3 more minutes. Now add the cashew paste and fry for one more minute. Add the khara garam masalas to it. Now add the whipped cream and mix everything so that the gravy has a smooth texture. Add 4-5 cups water and let it boil to a smooth consistency. After 2-3 minutes, turn off the flame and drop the kofta balls into the gravy. Your paneer malai kofta is ready, let it sit for 10-15 minutes before serving, the kofta will absorb the gravy and thus, the gravy will become thick in consistency.
After that you can serve it with naan, or tandoori roti or freshly made rice or any rice preparation like pulav or jeera rice.
Decoration :
You can decorate your yummy paneer malai kofta with some grated panner, some red chilli powder, corainder leaves and top it with fresh cream. Below is a snap of how mine looked like:
Paneer malai Kofta, just after putting off the flame.

Paneer Malai Kofta, after it absorbed the gravy and was decorated with grated paneer.


Saturday, 10 August 2013

How to make pizza base at home

The below pizza base recipe would be adequate to make 4 medium size thin crust pizza or 4 regular size thick pan pizzas.
Ingredients required:

  1. 4 cups refined flour 
  2. 2 tsp dry yeast
  3. 1 cup warm water or 1/2 cup warm water and 1/2 cup milk
  4. 1/4 cup olive oil or vegetable oil
  5. 1 tsp baking powder
  6. 1 and 1/2 tsp sugar
  7. 1 tsp salt
Method:
take 1/2 cup water and 1/2 cup milk. Mix together and then warm it up either on stove or in oven, it should be luke warm (when you put your finger into it, it should be tolerable). I heat mine in the microwave oven at 350 W for 1 minute. Add the yeast to this water and milk mixture and stir to dissolve the yeast completely. Add salt and sugar to this mixture and dissolve them as well. Set aside for 10 mins (this would help the yeast start fermenting). Now take the flour in a container where you can kneed it. Make a well in the center and then add the olive oil to it. mix well by rubbing the flour and the oil mixture between your palm. Now start kneeding it by gradually adding the yeast mix to it, if required, add more water and kneed to a soft dough. Trasfer this dough to a clean container, dusted with refined flour, cover with a wet cloth and set aside. Let it sit like that for 40 min - 1 hour in a warm place. This would ferment the yeast and the flour would rise to double the original size.
After an hour, make 4 equal size balls of the dough. Roll out each ball in a round shape pizza base. You can do it either with the help of a rolling pin or you can simply beat the ball with your hand, slowly expanding it in all directions. I prefer the rolling pin method because it gives a smooth and even base. When rolling out the pizza base, dust the ball once with plain flour or flour and then you can go ahead and roll it. Roll the base out to the thickness that you desire.
Now comes the baking part to cook the pizza base. For baking, preheat the over to 220 degree celcius. Now , we would bake the pizza bases one by one. Put the first pizza base into a round baking tray or on the microwave grill and then put it inside the microwave, let it bake for 5-7 minutes on 220 degree celcius if you require a softer base, if you want crunchy base, further bake for 2-3 more minutes till you see the base has become crispy. You would also see the base rising like a roti while it bakes. 
Once done, you take the pizza base out, spread pizza sauce, your selection of toppings and cheese on top of it and then put it back in the over for just 1-2 mins on regular microwave (350 W). Take it out and its ready to be eaten.
Alternatives:
For the base material: If you prefer a more healthy pizza base, you can use a 1:1 mixture of refined flour and normal wheat flour.Further more, you can altogether use wheat flour. Or, you can use a mixture of wheat flour with other healthy flours like soya flour, and crushed oat. 
For baking the pizza: You can bake the pizza base on a pan as well, if you don't have a microwave oven. Put it in a pan with cover / lid, cover and cook on low flame for 5-6 minutes (or as per the crunchiness required).


Monday, 24 June 2013

Tangy spicy potato roll

This roll is again very easy to make, with minimum ingredients and is tangy and yummy. Acts as a good appetizer. Can also be used a full fledged lunch or dinner recipe. So, here goes the recipe -
Ingredients for roll:
  • Flour (Aanta) - 2 cup
  • Milk - 1/4 cup (or as required, to be used while kneeding the dough)
  • Water (for kneeding the dough)
Ingredient for filling:
  • Potatoes boiled and peeled - 4 to 5
  • Curd - 1/4 cup
  • Turmeric powder - 1/4 tsp
  • Coriander powder - 1 tsp
  • Cumin powder - 1 tsp
  • Salt to taste
  • Chaat masala powder - 1 tsp
  • Green chilli - 2 to 3
  • Green peas - 1/2 cup (optional)
  • Onion - 1 large
  • ginger - garlic paste - 1/2 tsp
Ingredients for garnish:
  • Mayonnaise - 5 tbsp
  • Coriander - finely chopped - 2 tbsp
  • Tomato sauce - 2 tbsp
  • Lettuce leaves - cleaned and washed
Method:
  •  Cut the potato into small cubes (need to be of even size). You can even mash the potato lightly so that they break into uneven crumbled pieces.
  • Add coriander, cumin, turmeric powder and chaat masala powder to the curd and mix well.
  • Add potatoes to the curd mix and mix well so that the potatoes get coated with the curd.
  • Now put the potato mix in the freeze to marinate
  • Cut the onion into thin long slices and keep aside
  • Now, while the potato marinates, we can prepare the rolls base (chapatis)
  • For this, make a soft dough out of the flour by adding the milk and then water as required.
  • Divide this dough into 5 equal large balls and roll each ball into a chapati (round one) with the help of the rolling pin
  • Now heat a pan. Here you can either bake the rolled out chapatis without applying any oil or you can brush it up with butter or oil on both sides . Cook each one to a crisp chapati if you are using ghee or oil, put in a hot pot or bread basket so that it remains hot.
  • Now heat a thick bottom pan and add 2-3 tbsp of refined oil to it.
  • Once the oil heats up, add the onion and ginger garlic paste to it and saute till the onion turns translucent.
  • Once the onion is translucent, add the peas to it and cook for a minute or so
  • Now, add the marinates potato mix to this mixture and stir properly so that everything mixes up well and fry till potato turn a bit golden in color
Potato filling while its frying

  • Now add salt to this mix as per taste and mix well.
  • Spread out each chapati one by one, spread a layer of mayonnaise and a layer of tomato sauce on it. Spread a lettuce leave on top of it to cover almost the whole roll.
  • In the middle, add a thin layer of the potato mix.
  • Spread some coriander over it
  • Roll out the roles from it.
  • Serve hot with green chutney or chilli sauce.
And the rolls are ready...

Monday, 3 June 2013

Super Fast Egg Bhurji (Dry Egg Dish)

This Egg bhurji is another super fast recipe that I tried this week. It takes just 10-15mins for preparing it for 2-3 people. Its one of my time saving favorites now and guess what, hubby is not very keen of dry recipes (those without gravy) but he liked this one very much. It can be made as a replacement to a dry vegetable to have with chapatis or it can be used as a quick delicious side dish to almost any main course recipe. It can also be used as an appetizer during morning breakfast or evening snacks - in fact, anytime :)
So, without wasting further of your precious time, here goes the recipe:

Ingredients:

  • Eggs - 3
  • Onion - 1 medium
  • Tomato - 1 medium
  • Salt - to taste
  • Oil - 2 tbsp
  • Coriander powder - 1/2 tsp
  • Cumin powder - 1/4 tsp
  • Turmeric - 1/4 tsp 
  • Coriander leaves - cleaned and cut into small pieces - 1 tsp
  • Green chilli - 1

Method:

  • Cut onion, tomato into small pieces
  • Cut green chilli into fine pieces
  • In a thick bottom container, heat oil
  • When oil heats up, add the tomato and onion and saute till the onion turns translucent
  • At this point, add the spices,chilli and salt
  • Now, break the eggs and pour the content in the container
  • Mix the egg well with quick and swift movements of the spatula with rest of the ingredients. After a minute or so, the recipe would look like this:
                         

  • Stir for a minute or so, you need to take care that the eggs are neither sticky and watery nor do they dry up completely. When this consistency is reached (2-3 minutes after pouring the eggs in the container), turn off the flame
  • Add cut coriander leaves to this and your dry egg recipe is ready. Serve it hot with any main course, tea, or you can have it all on its own as well.

Sunday, 2 June 2013

Cold Coffee

This is a quick and refreshing cold coffee recipe that's a welcome respite in the hot seasons and a delight in the cold weather if you enjoy having cold beverages and food in the freezing winter :).
I had first made it 5 years back and since then it has been a hit in my family and friends.
So, here I reveal the secret behind my cold coffee recipe:
PS: this recipe would serve two.

Ingredients

  • Instant Coffee powder - 1 tsp
  • Milk - 2 cups
  • Ice cubes - 10-15
  • Sugar - 2 tsp
  • 2 scoops vanilla ice cream (optional)
  • Chocolate sauce 

Method

  • Add sugar, instance coffee powder to the milk and put in a juicer jar
  • Mix till the mixture becomes froathy
  • Add one scoop icecream to the above mixture and mix for a few more seconds
  • Cold coffee base is ready , set aside
  • In another jar, churn the ice cubes to pieces in the mixer
  • Take two mugs, decorate them with the chocolate sauce (see the chocolate sauce recipe below if you don't have a ready made one)
  • Add half the crushed ice to each of the mugs
  • Pour half the cold coffee base in each of the mugs.
  • Add half scoop of ice cream to each of the mugs.
  • Pour some more chocolate sauce over the vanilla ice creams and serve immediately.
                                     
Top view of the cold coffee

Side view :)

    Chocolate sauce recipe:

    Ingredients:
    • 3-4 bars of milk chocolate or dark chocolate
    Method:
    • Add the bars of chocolate to a microwave safe bowl
    • Set in the microwave mode on 450Watt for 2 minutes (or till the chocolate bars become soft and melt)
    • Take out of the microwave, Mix with a spoon with light hands to get a smooth texture over the molten chocolate.
    • Pour it over the recipes as required.

    An additional topping on the cold coffee:

    Small amount of grated chocolate can be spread over the cold coffee for additional flavor and look.

      Monday, 27 May 2013

      The Pizza

      This pizza recipe is a savior when it comes to quick and easy recipes which are both filling and yummy. So, its particularly a favorite for bachelors because of the ease with which it can be made and also among children because of the yummy taste it gives. Plus the added factor that it can be loaded with a lot of wholesome, healthy and colorful veggies of choice makes it a favorite among the mothers as well :) . I particularly love to make this recipe on weekends, like friday nights for dinner when I am tired and exhausted by the whole week's hectic schedule and also I have different veggies left in small quantities in my freeze from over the whole week. This is a golden recipe to utilize all those veggies!
      I used a ready made pizza base for this pizza, if you have time, you can go ahead and prepare the pizza base on your own. I also used some cooked soya from the morning recipe which was left over in the freeze. I used some basic pizza topping ingredients which were available in my freeze, however, you can experiment with a lot of other toppings like mushroom, bell peppers of different color, corn, cottage cheese, jalapeno, olive etc.
      So, here goes the recipe of my pizza :-
      (Preparation time for each pizza is about 5 minutes, preparation time for the sauce is 10 minutes)

      Ingredients:

      1. For pizza base sauce :

      2. For pizza base:

      • 4 small ready-made pizza base or 2 medium ready-made pizza base

      3. For topping: 

      • soya nuggets 
      • capsicum cut in very thin slices
      • onion cut in very thin slices
      • sweet corn (Ready to use)
      • Add any other topping of your choice like jalapeno, pineapple, mushrooms, bell peppers, cottage cheese, olives etc.
      • 2 teaspoons chilli flakes
      • 2 teaspoons oregano
      • 1 cup shredded pizza cheese 

      Method:

      Divide the topping ingredients into 4 equal proportions if you are using 4 pizza bases, else divide them into 2 equal proportions if you are using 2 medium pizza bases. 

      For making each pizza, repeat the following steps:

      • Put the pizza base into the microwave oven (at 450WT, microwave mode) over a grill for 1 minute, this will heat up the pizza base a bit.
      • Take it out, spread one layer of tomato pizza sauce on the pizza.
      • Spread 1/8 cup of cheese on the pizza base (in case you are using 4 small pizza bases) or 1/4 cup of cheese (in case you are using 2 medium pizza bases)
      • On top of the cheese, spread one portion of the vegetable toppings on the pizza.
      • Sprinkle another layer of cheese on top of the vegetable toppings in the same proportion as done before.
      • Place this pizza back into the oven at the same temperature setting as earlier , but for 4-5 minutes (or until you see the cheese melted and settled well on the pizza)
      • Take it out, sprinkle the chilli flakes and oregano on top of it
      • Cut the pizza into equal proportions and serve immediately.
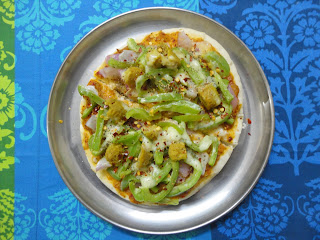
             Here's some pic of my yummy pizza :            


      More time can be saved if you have a manual or electric chopper or a food processor wherein you can get your veggies chopped to fine pieces in a jiffy. Otherwise, you can also keep them cut in a day or so in advance in an airtight container in the freeze. 

      Tangy tomato sauce in ten minutes

      This sauce is very similar to pizza base sauce or pizza sauce. the reason I choose to name it tangy tomato sauce is because I recently discovered that this sauce could do more than just act on the pizza base. I used it with fried rice as a replacement for the traditional tomato chutney that takes much more time to prepare, and it worked wonderfully. I also tried it in a small quantity with my tomato pasta and it spiced up the pasta wonderfully.
      Preparation time for this recipe is 10 minutes and the quantity specified below is fit to serve 4.
      So here you go -

      Ingredients needed for the tangy tomato sauce :

      • 3 big ripe tomatoes
      • 2 tbsp olive oil
      • 8-10 cloves garlic (if you like strong flavor of garlic, else go with 5-6 cloves)
      • 1 tsp oregano
      • 1 tsp chilli flakes
      • Salt to taste

      Method:

      • Add the tomato and garlic cloves in a grinder and grind to a puree
      • Pour this puree in a thick bottom pan
      • Add olive oil to the tomato puree
      • Put this mixture over stove at low heat, and let it simmer for 5 minutes or until the raw smell of tomatoes is gone.
      • Add chilli flakes, salt and oregano to it and cook for another one minute
      • Put off the flame
      Your tangy tomato sauce is ready to be used on pizza bases or with pasta or fried rice. Maybe you can discover yet another use of it, I would love to hear back on that.

      PS : Adding the picture soon....